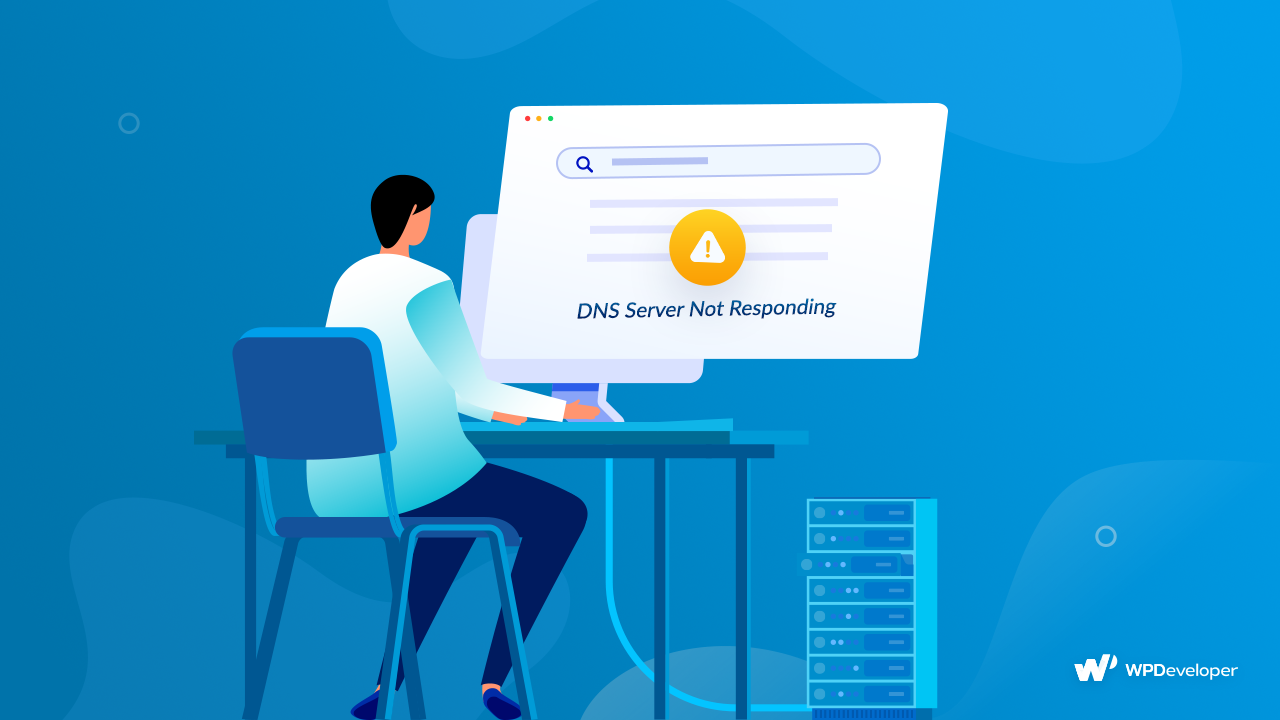
Visiting a website through searches or links, you may have faced this common issue called the “DNS Server Not Responding” error. This issue occurs because the Domain Name Server (DNS) is not able to find that site or may have faced some issues. Your web browser, desktop setup, or others can cause this DNS server not to respond to an error.
If you want to visit any website, you have to then process it through the Domain Name Server (DNS) system. The process is very simple, when you search, click or insert any link to visit the website, browsers first reach out to this decentralized naming system that converts your hostname into IP address.
If the DNS server is not able to recognize the site link, it comes up with this “DNS Server Not Responding” error. It tries to send out this message signaling you may have lost your network or internet access.
The question is why & how to fix the “DNS Server Not Responding” Error? Don’t worry! Here in this blog, you will get to know the reasons and solutions to fix your DNS server error immediately. Get started!
What Are The Causes For DNS Server Errors?
If DNS server errors take place, there are several issues behind this. That you have to know first what the real causes of that DNS server error take place. Go through the major points in-depth below:
DNS Gaps:
If any website owner changes their domain address and switches to another hosting service provider for better service. That Time The global DNS server takes some time to update the new IP address of any changed size, and it takes approximately 72 hours. It is known as DNS propagation time. Several online global DNS propagation checkers are available to help you check whether the DNS records are globally propagated or not. By that time, if you try to reach out to that site, then the DNS gaps happen, and you fail to reach your searched site.
DDOS Attack:
Distributed Denial of Service (DDOS) attacks can occur by having attacks on one or more DNS servers at a time. If it’s happened at that time you are searching for your queries, this attack will slow down your DNS query response time, and guess what occurred is the “DNS Server Not Responding” error.
If you just go through the DNS server working pattern, you will get to know that all DNS servers connect through a global network and respond at a time. So when you are putting your queries, every DNS server will check and match the IP address. If any of the servers doesn’t agree that your query is authorized, you will surely get the “DNS Server Not Responding” error. And it can happen through DNS gaps, DDOS attacks most commonly, or others.
How To Fix “DNS Server Not Responding” Error

DNS server errors are caused by network issues, internet connectivity problems, your operating system, Windows or iOS setup, modem or router-related issues, or many others. That’s why you have to know the real reason behind it and act accordingly. Check out all the processes which can help you fix the “DNS Server Not Responding” error right away:
Switch To Another Web Browser
The first thing you should do is check if this happens for browsers or not. For that, you have to switch to a new browser to cross-check. And the most common browsers to try out are Google, Safari, Mozilla Firefox, Microsoft Edge, etc. And if your query works fine in other browsers, you can go back to your own browser and check for manual updates.
Afterward, you can query your searches. And if you face the same issue then you should uninstall your current browser and install it again. Again if you face this issue, you have to then try out another way for a solution.
Connect To A Different Device
Next, you should check your query on different devices. If you see a similar “DNS Server Not Responding” error, you should then move out to your mobile data and check again. If you see similar kinds of issues, you can have the sense that the website you are looking for might have switched its browser or something else can occur. You can then switch to the next step to solve.
Restart PC In Safe Mode
Afterward, you have to try switching your PC to safe mode by restarting it. And for Windows and iOS users, you have to follow different methods.
Windows Users:
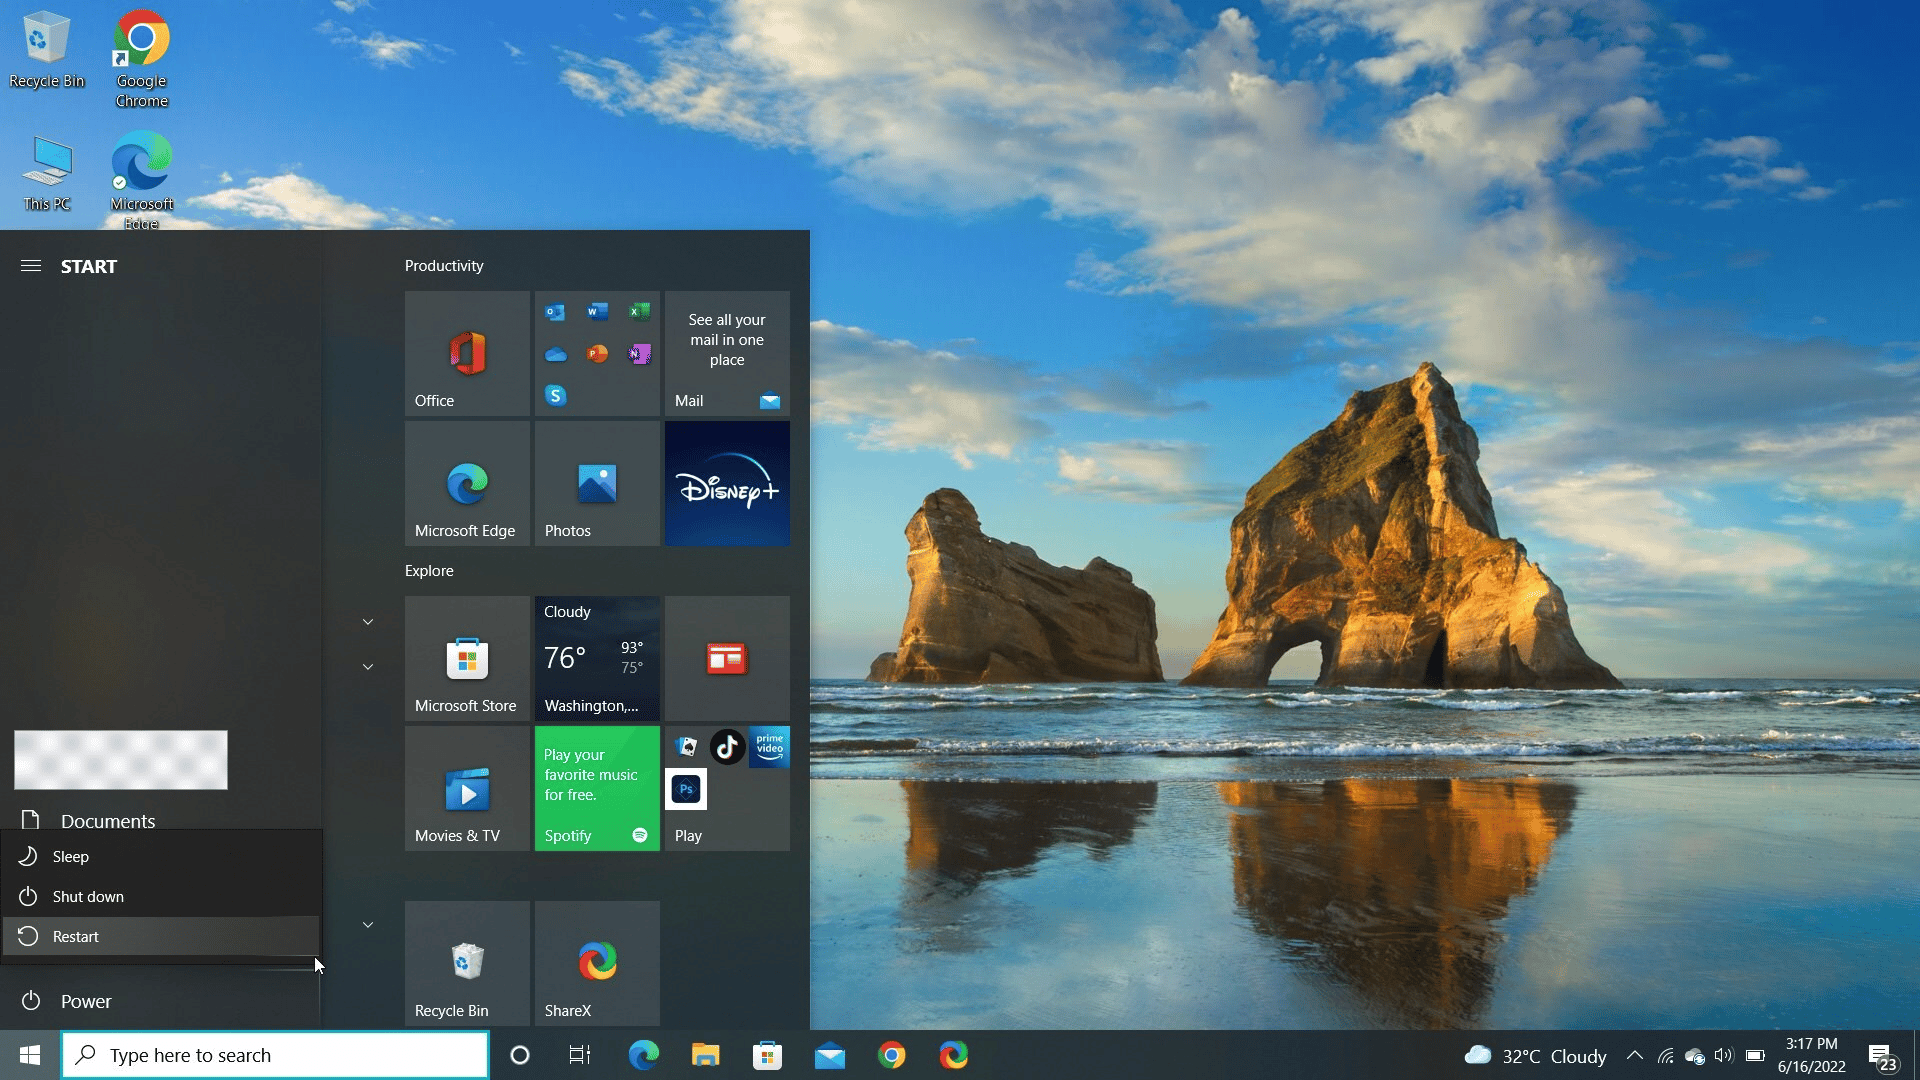
You have to click on the Windows button and above the ‘Power’ button icon, you will get the ‘Restart’ button. That’s It.
iOS Operators:
If you want to take your iOS in safe mode, you have to then first shut down. And start from the bootup and press & hold the Shift key. During the hold, it will boot and you can release the Shift key when the Apple logo and progress bar appear. This will take your Mac in safe mode.
Correct Or Change DNS Server Address
You can also correct or change your server issue from your desktop following the proper method. This is another effective solution to fix the DNS server not responding to errors. Surely this is different for Windows or Mac users. Let’s check out both operating system ways to change or correct DNS server addresses.
For Windows Users:
If you are using Windows then use the ‘Search’ option beside your windows ‘Start’, and type ‘Network Status’. Afterward, click on the ‘Change Adapter Settings’ and right-click on your active network connection to hit ‘Properties’.
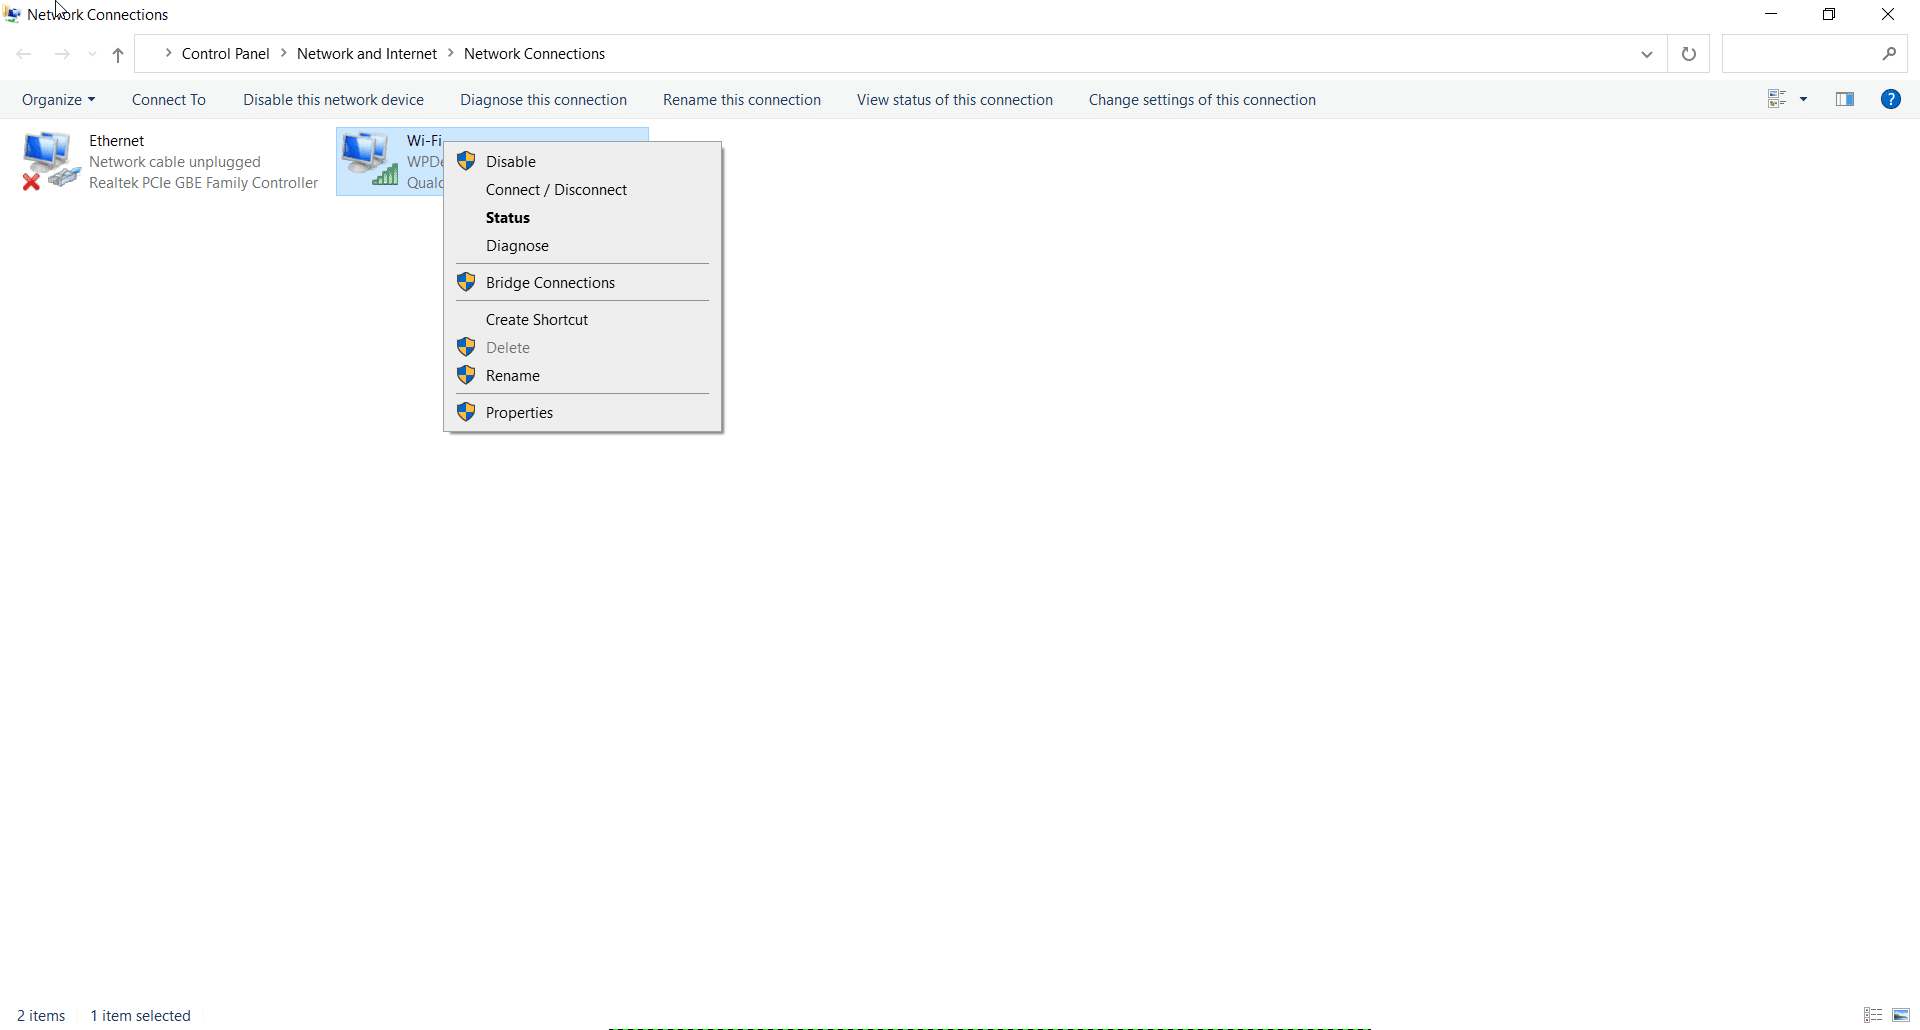
Next, you have to give a left-click on ‘Internet Protocol Version 4’ (TCP/IPv4) and press ‘Properties’. But if you are using IPv6 then change that one instead.
Now, click on “Use the following DNS server addresses:” and type in one of the following public DNS server addresses:
Use 198.54.117.10 for the Preferred DNS server
Or use 198.54.117.11 for the Alternate DNS server
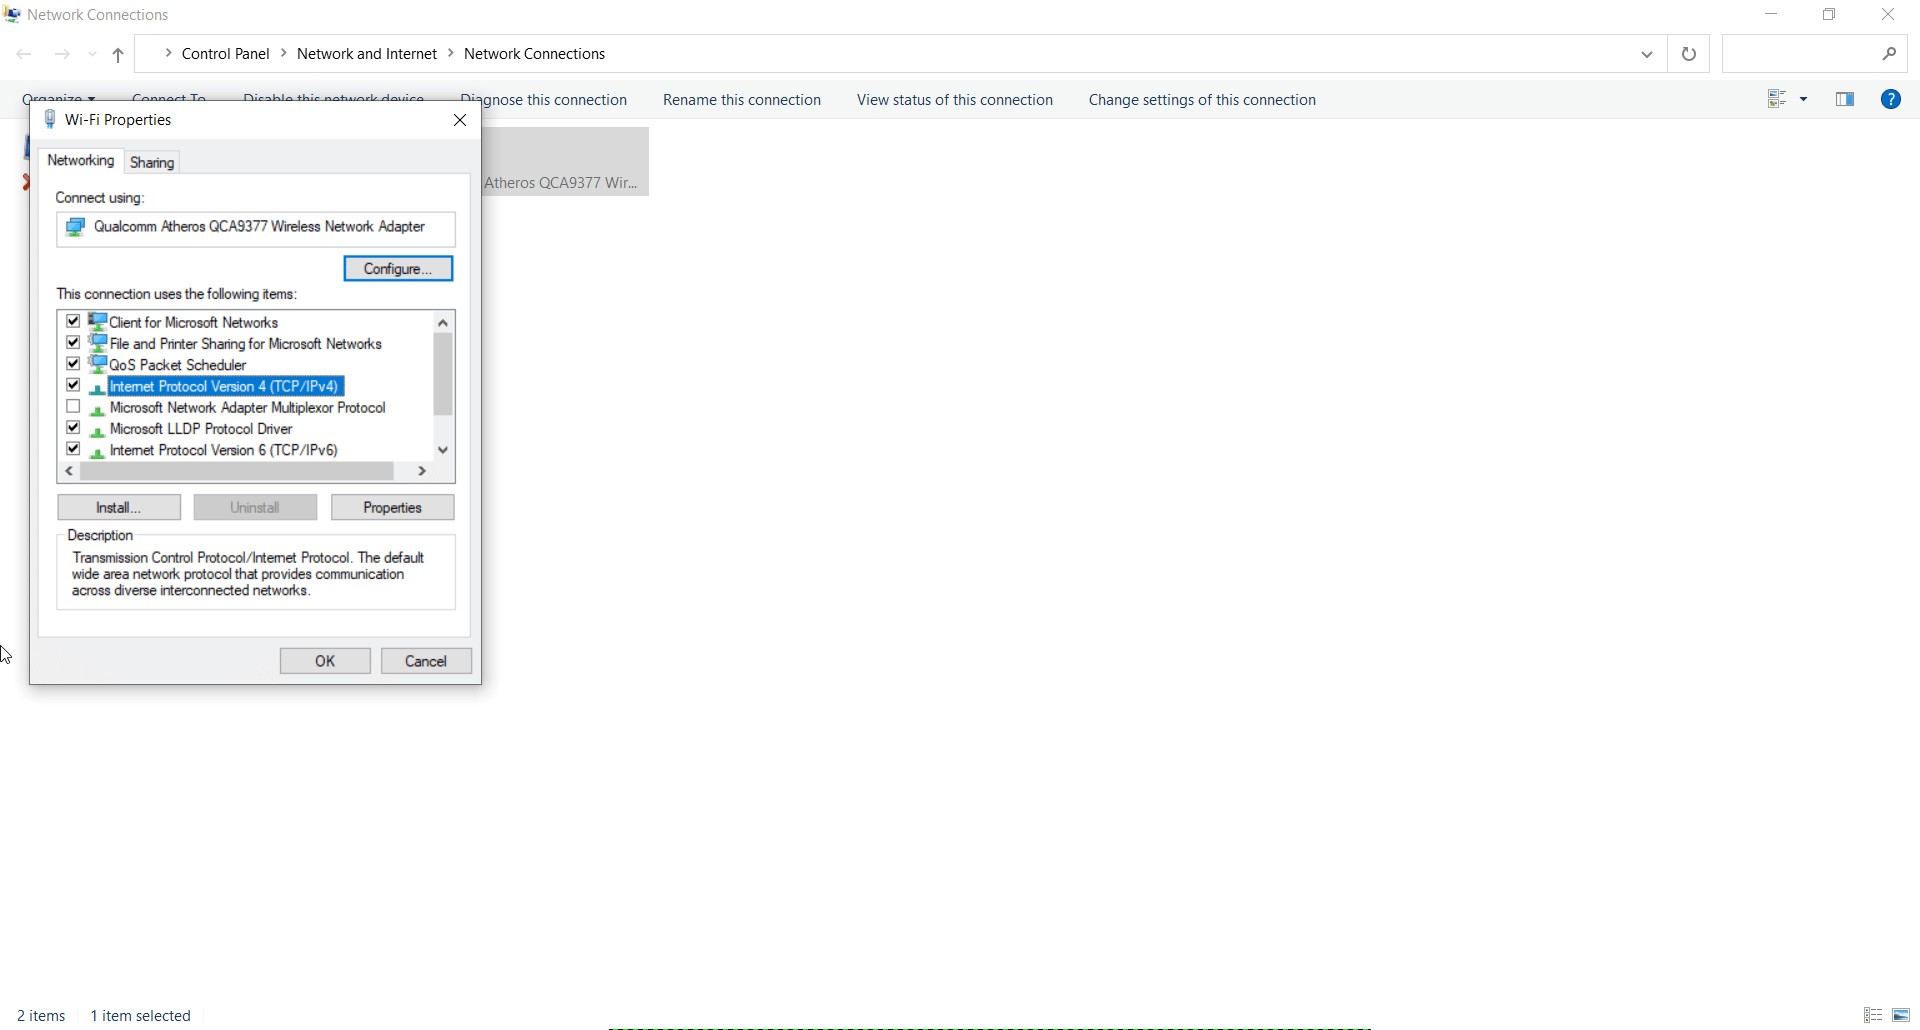
Now press ‘OK’ and try your website again to check if everything is working fine or not. There is one thing you have to prepare for is that you may have to try more to make your sites work.
For Mac Users:
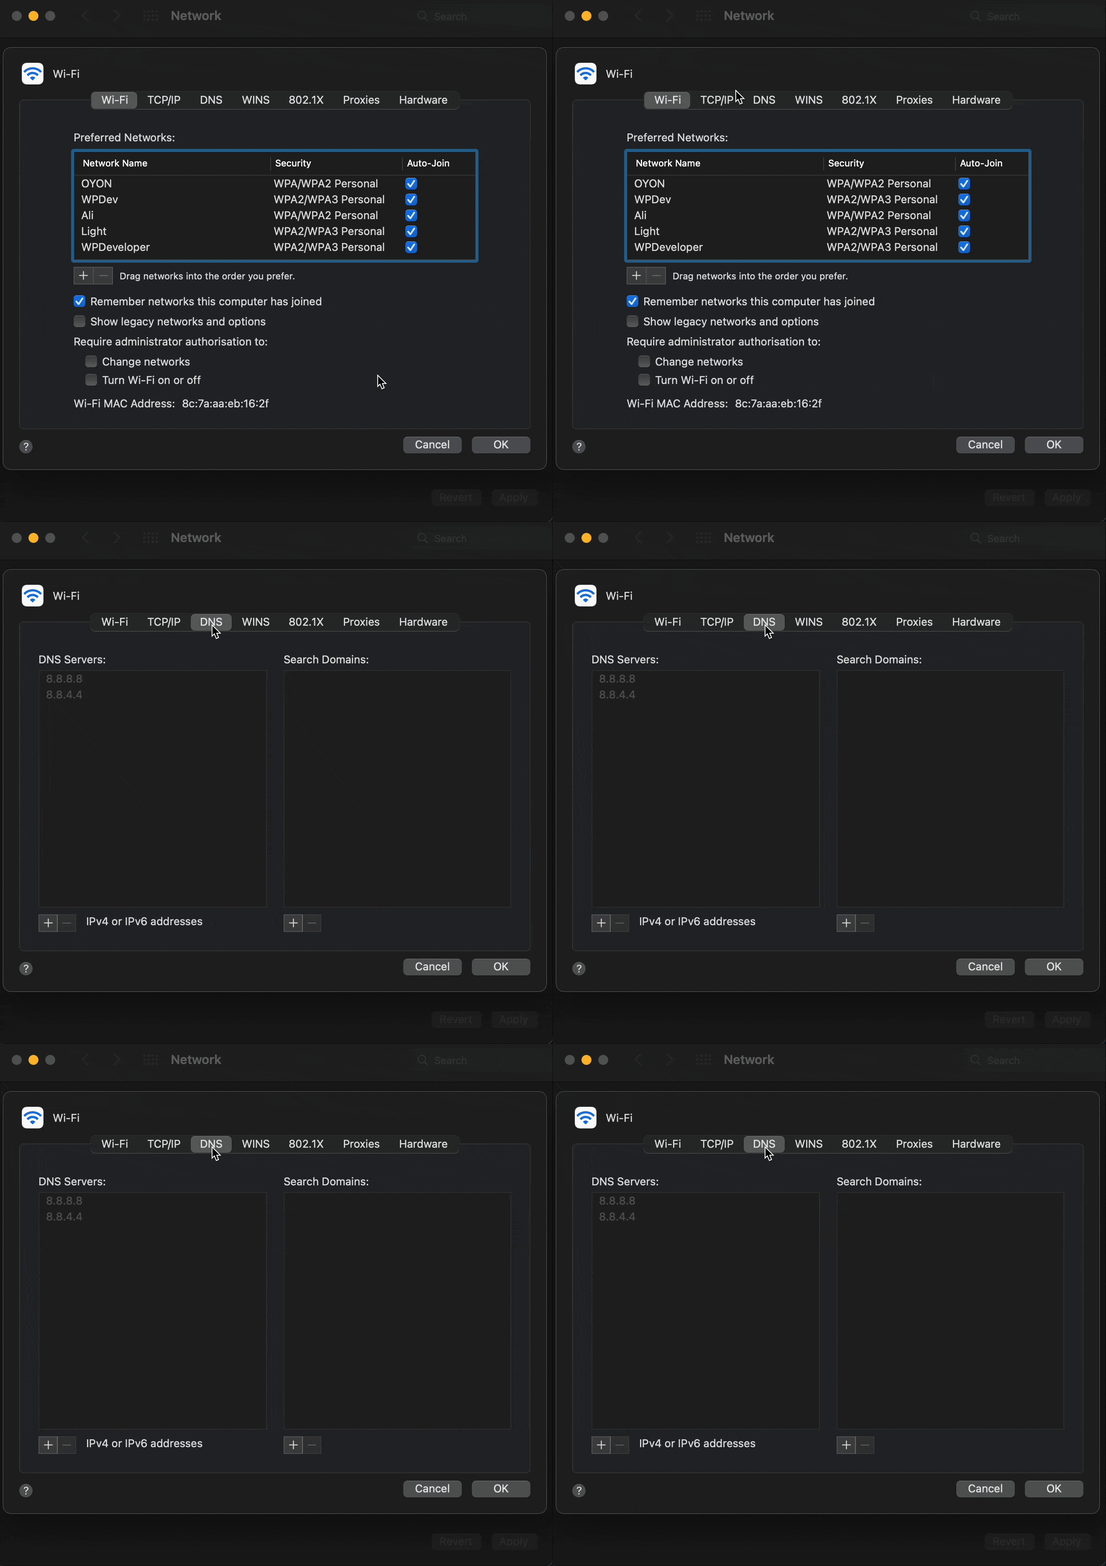
You have to first go to the ‘System Preferences’ →Network →Advanced →DNS tab.
Afterward, you have to click on the little ‘+ sign’ which is located on the lower left. From there you can add a new DNS server.
Now type in the numbers of a public DNS server as we have mentioned for the Windows opening system above.
After making all the changes, you have to ‘Click OK’ and then Apply to change or correct your DNS server address on MAC.
Restart Modem & Router
You can restart the modem & router to resolve the DNS server not responding error by just turning off and on the router. If you restart your modem & router, it will help to clear the router and modem cache-store of IP addresses. And make a clean local area network’s router cache. You can follow these steps:
First, you have to unplug your modem and router power cables. And allow both your modem and router to turn off for at least 30 seconds.
Afterward, reconnect your modem and wait till it comes back online.
Click on your website link to check. If you still get this DNS server not responding error, you can try connecting an Ethernet cable to your desktop or tablet device. And if your problem is still there, you can proceed to try the next solution.
Deactivate Antivirus & Firewall
You can deactivate your antivirus & firewall temporarily to check your DNS server not responding error is still there or not. Because sometimes the antivirus & firewall programs can interfere with your current network connections and cause DNS issues.
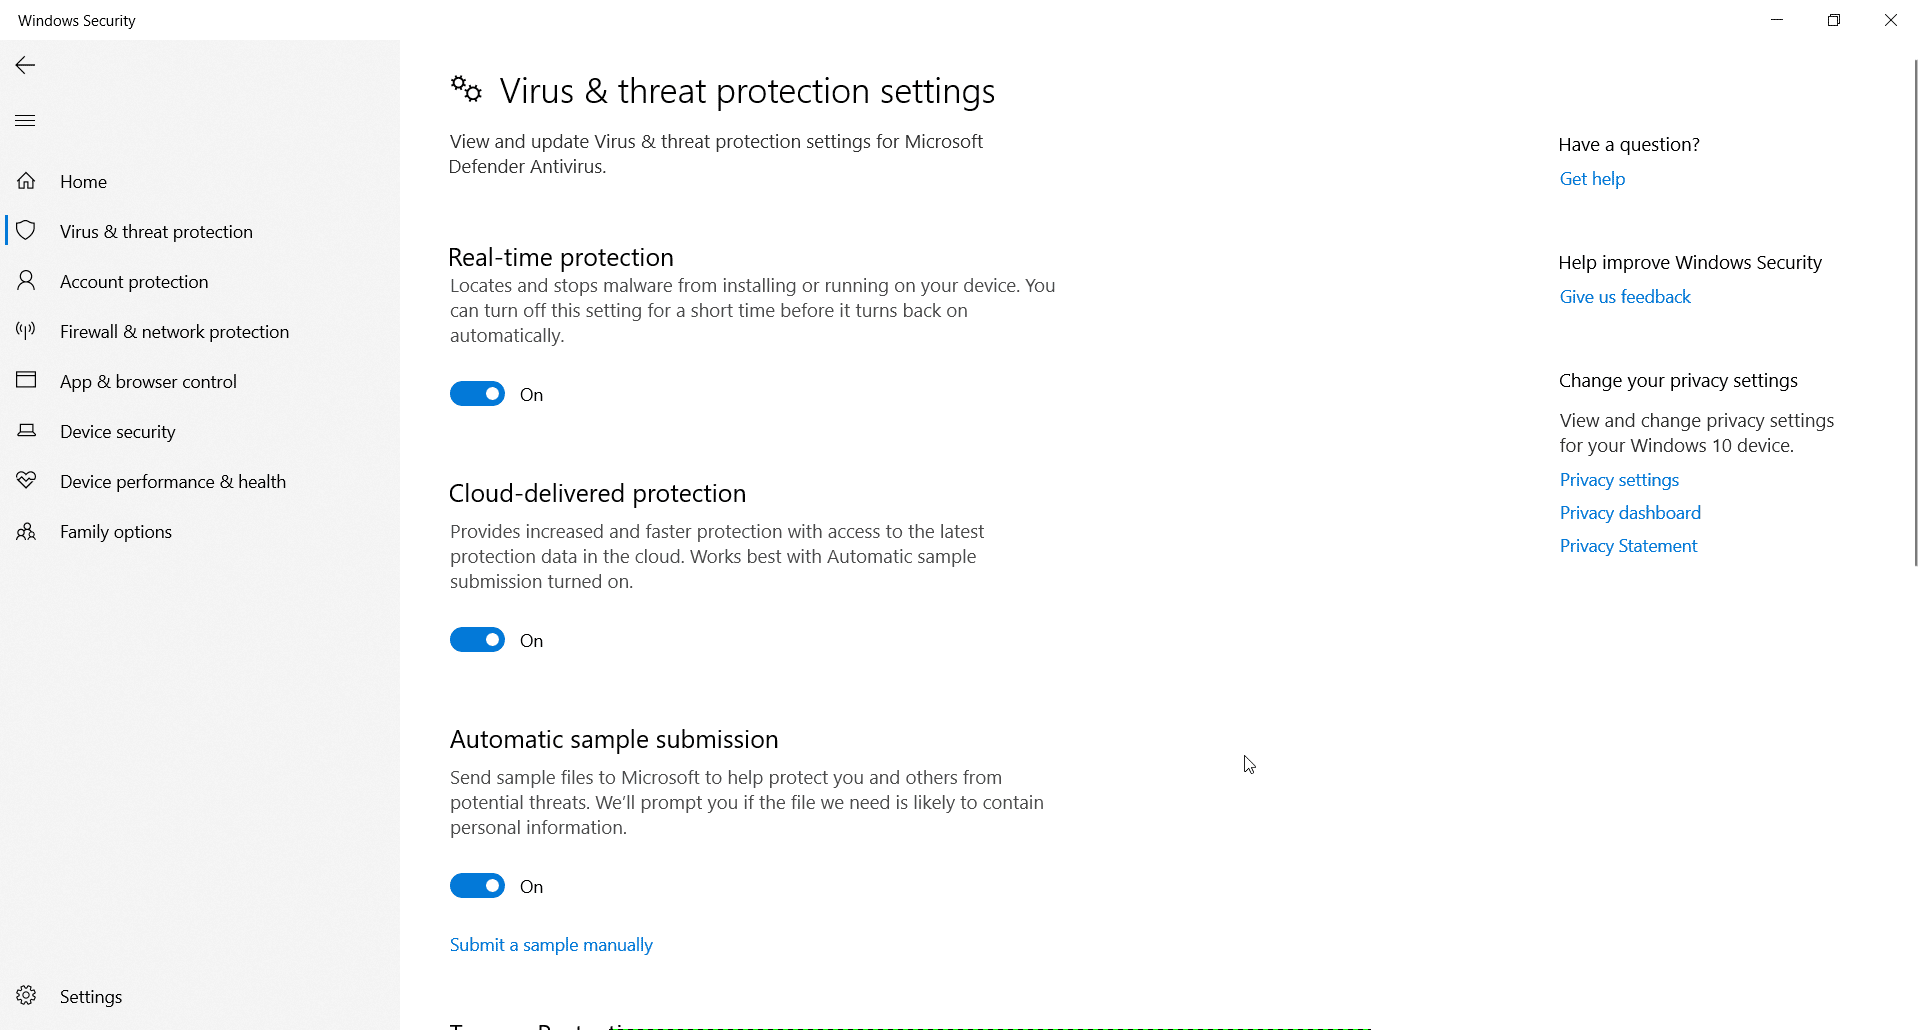
Deactivate for Windows users
Navigate to your control panel and navigate to Update & Security > Windows Security > Virus & Threat Protection > Manage Settings. Follow these steps to disable your firewall.
Deactivate For Mac users
Navigate to System Preferences > Security & Privacy > Firewall. Afterward, select the ‘Firewall off’ option and look below to hit the ‘Click the lock to make changes.’
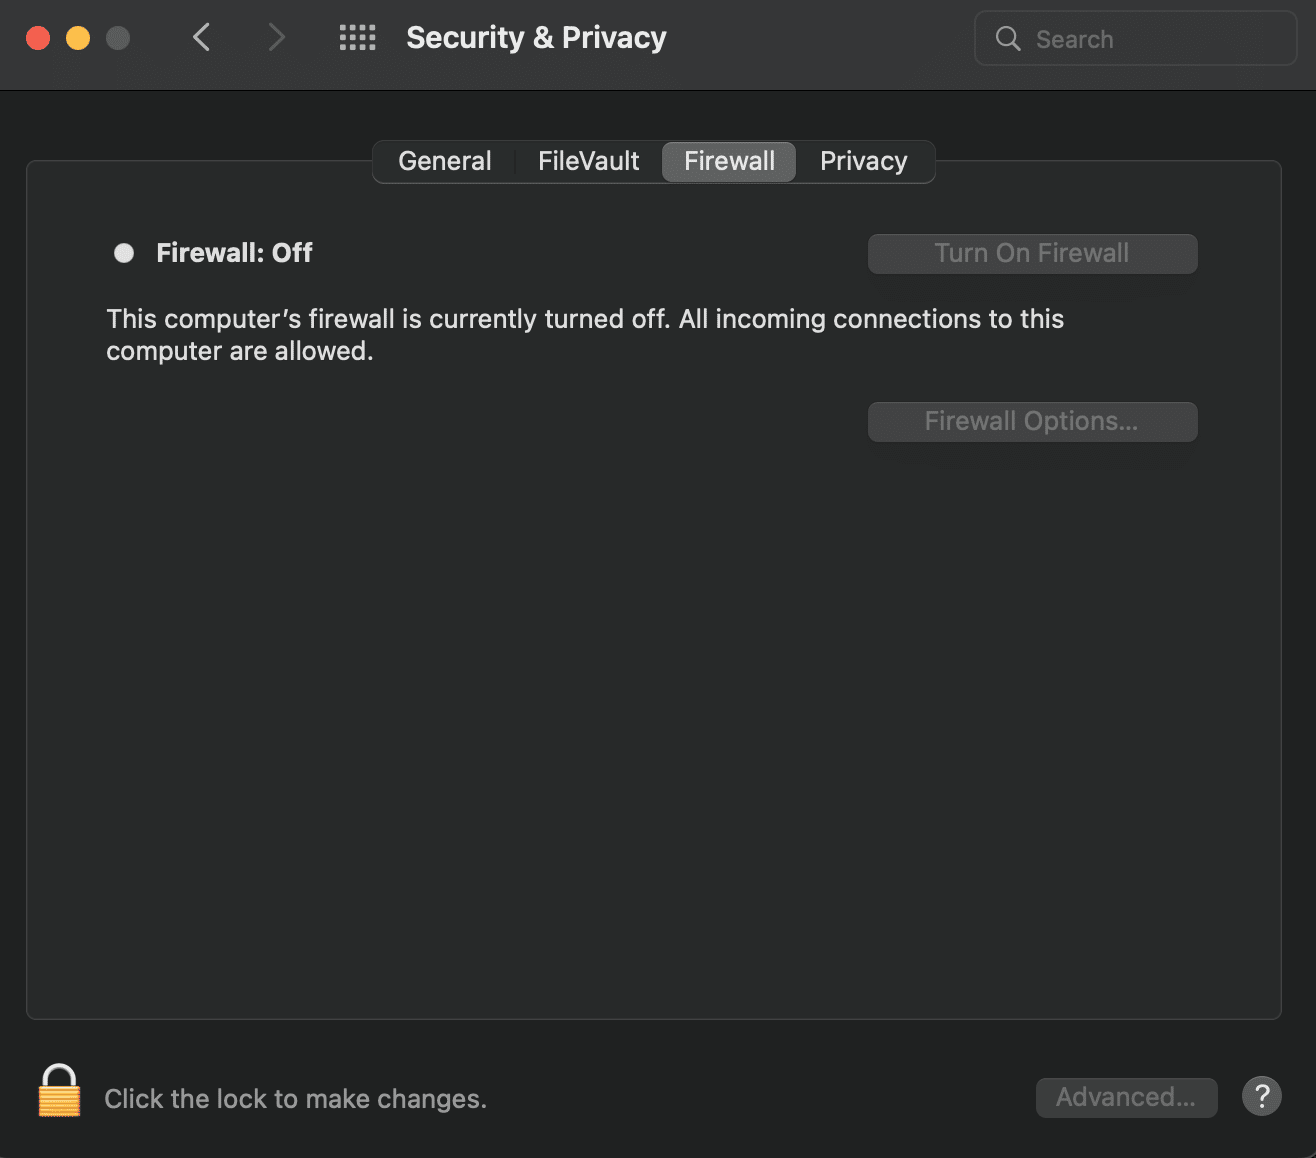
Once you have deactivated your firewall, you can check your website again. And if this resolves the issue then fine and if not you can reactivate your antivirus & firewall.
Now It’s Your Turn To Explore!
This is how simply by following this guide you can solve your DNS server not responding to errors from your favorable browsers and enhance your safe browsing experience. Hope you have found this blog helpful, you can then share your experience by commenting below.
Don’t forget to visit our blog page for more updates, blogs, or tutorials related to WordPress and others, and join our friendly Facebook community to get attached with all WordPress experts.


