60% of consumers abandon purchases due to poor payment options, difficult-to-navigate checkout layouts, etc. So, you can quickly reduce the amount of cart abandonment and grow your business if you integrate the appropriate payment gateway. If you are managing your website all by yourself on in charge of payment management, then you have come to the right place!
Today, we will show you how to integrate payment gateways into your Elementor site and manage transactions smoothly. So, dive right into the details to ensure an enhanced customer experience during each checkout process.
Why Should You Create a Payment Checkout Page with Elementor?
Before jumping into the tutorial on how you can integrate payment gateways with your Elementor site, let’s first check out why you should do it with the Elementor website builder over other options. Creating a payment checkout page with Elementor can offer numerous benefits, enhancing user experience and conversion rates while giving you the complete flexibility to customize as you need.
Here’s an in-depth breakdown of why you should consider using Elementor for your payment checkout page:
Endless Customization Flexibility With Elementor
Elementor, the most popular website builder, provides a drag-and-drop interface, allowing for easy customization of every element on the checkout page. Users can personalize the layout, colors, fonts, and overall design to align with their brand identity seamlessly without coding. Moreover, you can make checkout pages fully responsive across various devices and screen sizes, providing a consistent user experience regardless of the device used.
Versatile Payment Gateway Integration Capabilities
To ensure smooth transactions, Elementor integrates with several well-known payment gateways, including PayPal, Stripe, Square, 2Checkout, and others. So whether you manage your payments using the above-mentioned ones or others, you can easily integrate any of them and manage smooth payment transactions. Moreover, integration with CRM systems, email marketing tools, and other third-party services is also possible, streamlining the checkout process and enhancing customer relationship management.
Reduce Cart Abandonment Rate
Elementor allows for the creation of intuitive and user-friendly checkout forms, simplifying the information input process for customers. With Elementor’s intuitive design features, users can create visually appealing and user-friendly checkout pages, reducing cart abandonment rates. You can easily customize call-to-action buttons, add persuasive copywriting, and incorporate strategically placed elements with Elementor that can help optimize conversion rates.
Maintain Security Measures for Your Store
Since protecting sensitive customer data is the top priority for the Elementor ecosystem, checkout pages are built with the appropriate security measures in place. Customers’ trust and confidence are preserved through integration with safe payment gateways and adherence to industry-standard security procedures.
Improve Scalability and Adaptability
Because of Elementor’s scalability, companies can easily expand their checkout pages to accommodate growing product or service offerings. Elementor’s vast customization options and adaptable design options enable it to adjust to changing customer preferences and business needs. You can easily minimize unnecessary elements and optimize images and code with Elementor which contributes to a positive user experience.
Creating a payment checkout page with Elementor offers unparalleled customization, optimization, and flexibility, empowering businesses to create seamless and conversion-focused checkout experiences for their customers.
Popular Online Payment Gateway for Your Checkout Page
Now that we are convinced to create a checkout page with Elementor, time to choose the right online payment gateway and integrate it. We know the names of various online payment gateways. Here we have listed down popular payment gateways that are Elementor compatible.
👉 PayPal: PayPal is one of the most popular payment gateways worldwide, offering both traditional payment processing and PayPal Checkout options. It supports various currencies and provides a secure payment experience for customers.
👉 Stripe: Stripe is known for its developer-friendly API and flexibility. It supports multiple payment methods, including credit/debit cards, Apple Pay, Google Pay, and more. Stripe also offers advanced features like subscription billing and customizable checkout forms.
👉 WooCommerce Payments: Built specifically for WooCommerce users, WooCommerce Payments (formerly known as WooCommerce Stripe) integrates seamlessly with WordPress. It provides a streamlined checkout experience and supports major credit and debit cards.
👉 Square: Square is known for its simplicity and ease of use. It offers a range of payment solutions, including online payments, in-person payments with Square hardware, and invoicing. Square’s WooCommerce integration allows for seamless checkout experiences.
👉 2Checkout: 2Checkout (now Verifone) provides global payment processing solutions with support for multiple languages and currencies. It offers a variety of payment methods and supports recurring billing for subscription-based businesses.

3 Ways To Integrate Payment Gateway For Elementor Site Checkout
Let’s get started on what we’ve been waiting for; learning to integrate payment gateways on the Elementor-built checkout page. As we’ve already mentioned, you can integrate payment gateways in multiple ways. Here, we are mentioning 3 proven and tested ways to integrate payment gateways and checkout with the Elementor site.
Method 1: Integrate Any Payment Gateway You Want With Better Payment
Going for a payment plugin to integrate gateways is the best solution. If you choose the Better Payment plugin, then you will get all the popular payment gateways like PayPal, Stripe Payment, Paystack, credit cards, and the list goes on. Moreover, Better Payment supports 25+ global currencies, which will make your checkout page more accessible and increase conversion.
Here’s how you can integrate a payment gateway with the Better Payment plugin:
Firstly, make sure you have installed and activated the Better Payment plugin on your website. Copy and paste your PayPal, Stripe, Paystack, or whichever gateway you are using. You can retrieve these from your respective websites easily.
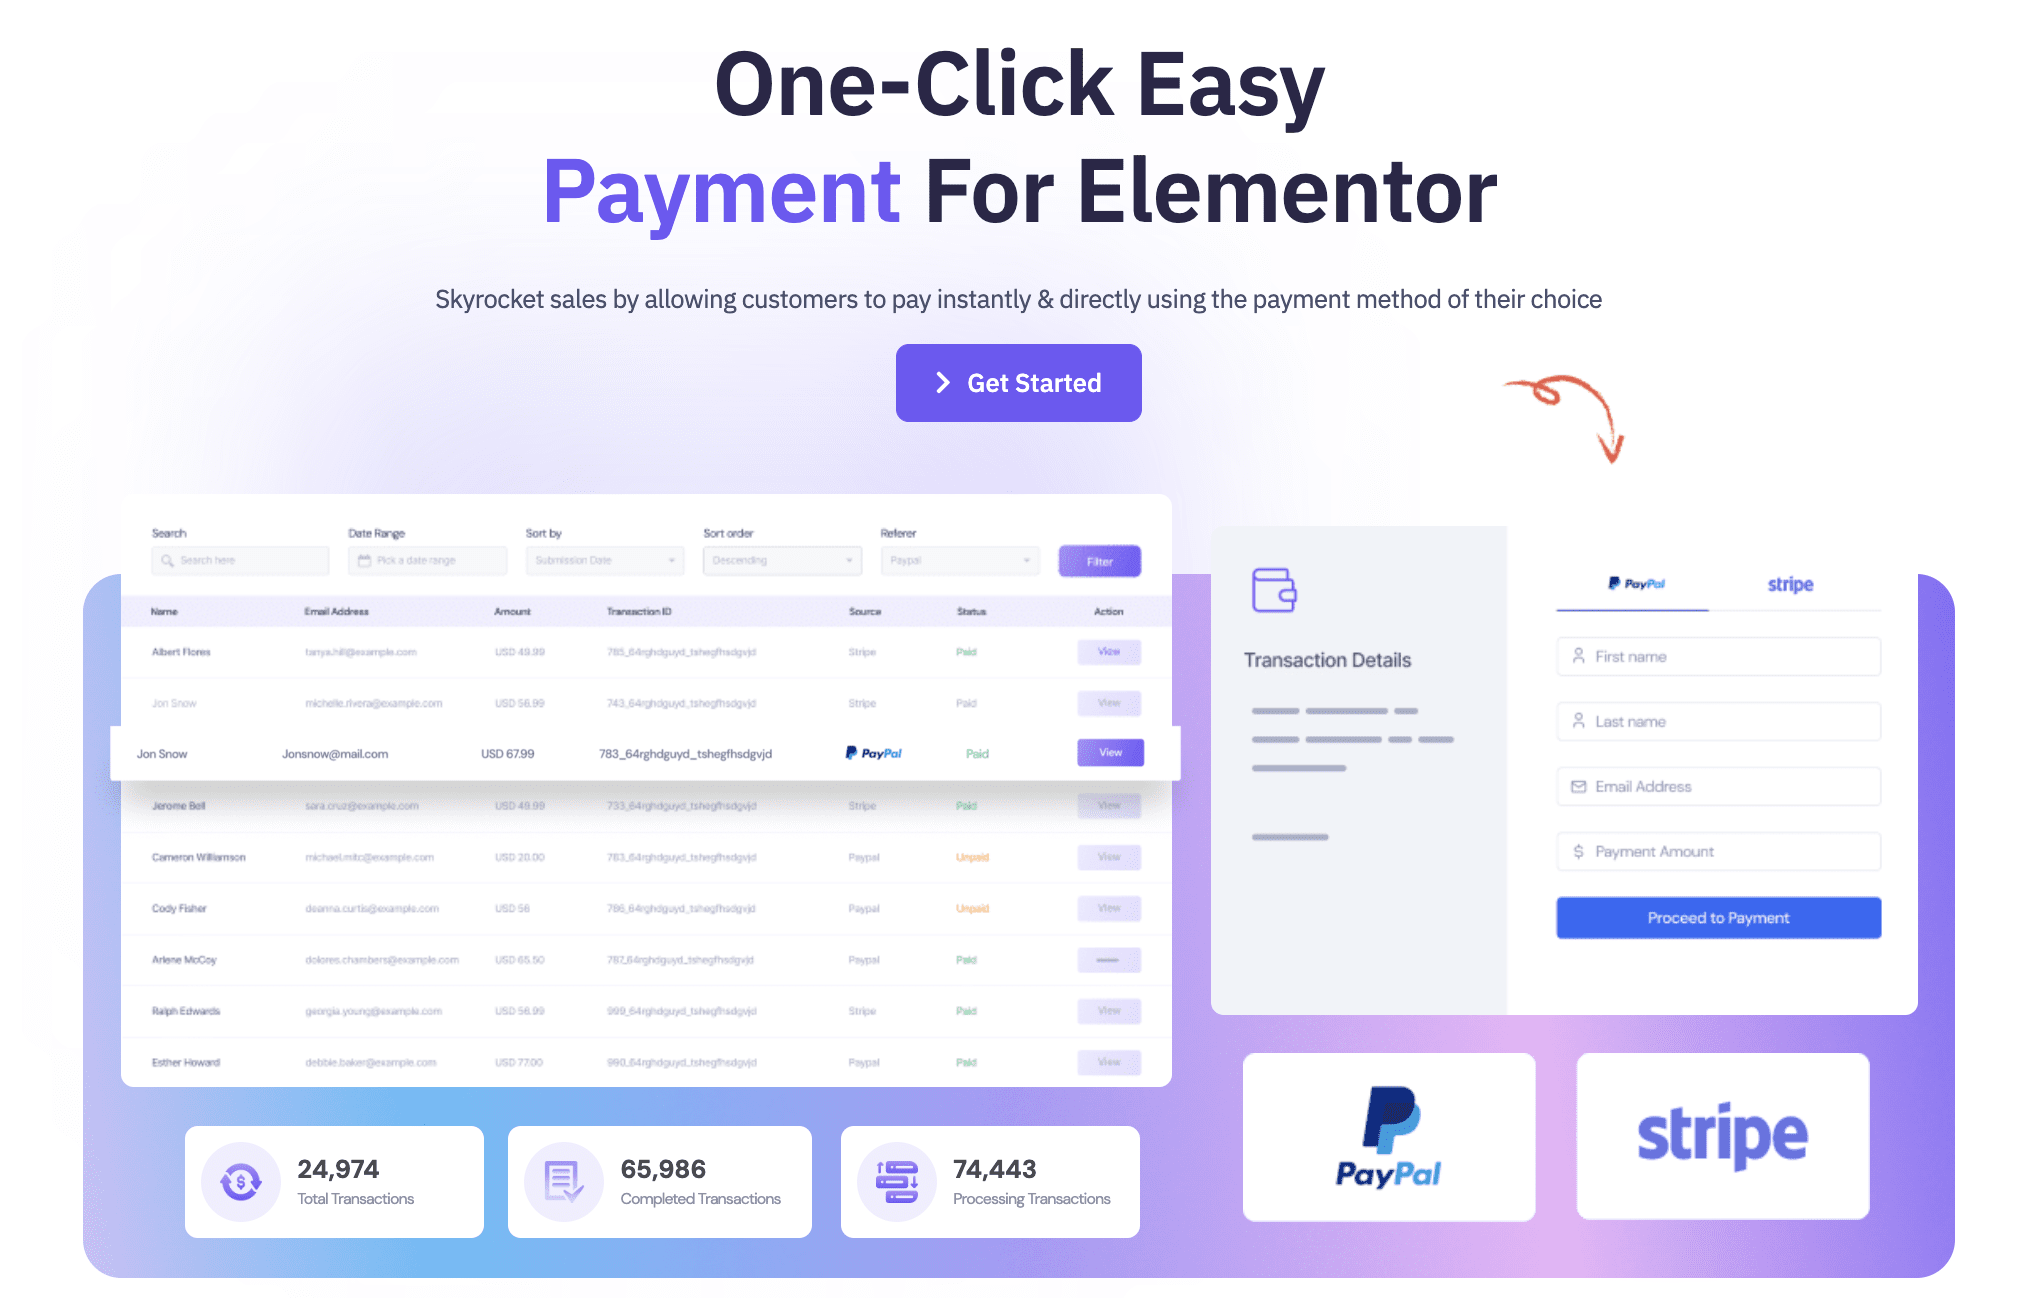
Now open the checkout page in the Elementor editor. In the widget panel, search for Better Payment. Then drag and drop the widget onto the page where you want to integrate the payment gateway. In Better Payment, 5+ form layouts are available to collect one-click payments. Design the form’s appearance as you want.
Better Payment gives you the opportunity to set custom Thank you messages, and error messages for unsuccessful payments, and preview every transaction history in a detailed listing view. After doing all the styling and customization, make your checkout page live. This is how easily you can integrate a payment gateway with Better Payment on Elementor site.
Method 2: Get Elementor PayPal Button For 1-Click Payment
To grant access to your website exclusively to PayPal users, you can achieve this by including a 1-click PayPal button of Elementor. You can accept any kind of payment with the PayPal Button widget for Elementor. You can easily collect your fees by selling a single product, such as an ebook, starting a fundraising campaign, or offering a subscription-based service.
But are you wondering how to add a PayPal widget button to your checkout page? It’s just a matter of one click. You will find the PayPal button widget in the Widget panel, just drag and drop it into the place where you want to add. This exclusive widget is available in Elementor PRO. So you have to purchase it first to get access.
Method 3: Integrate Woo Payments On Elementor Site [For Online Store Owners]
Woo Payments is a dedicated payment plugin to handle all transactions in your online store that is built with WooCommerce. You can accept credit/debit cards and local payment options, and most importantly, there is no need for setup or monthly fees.
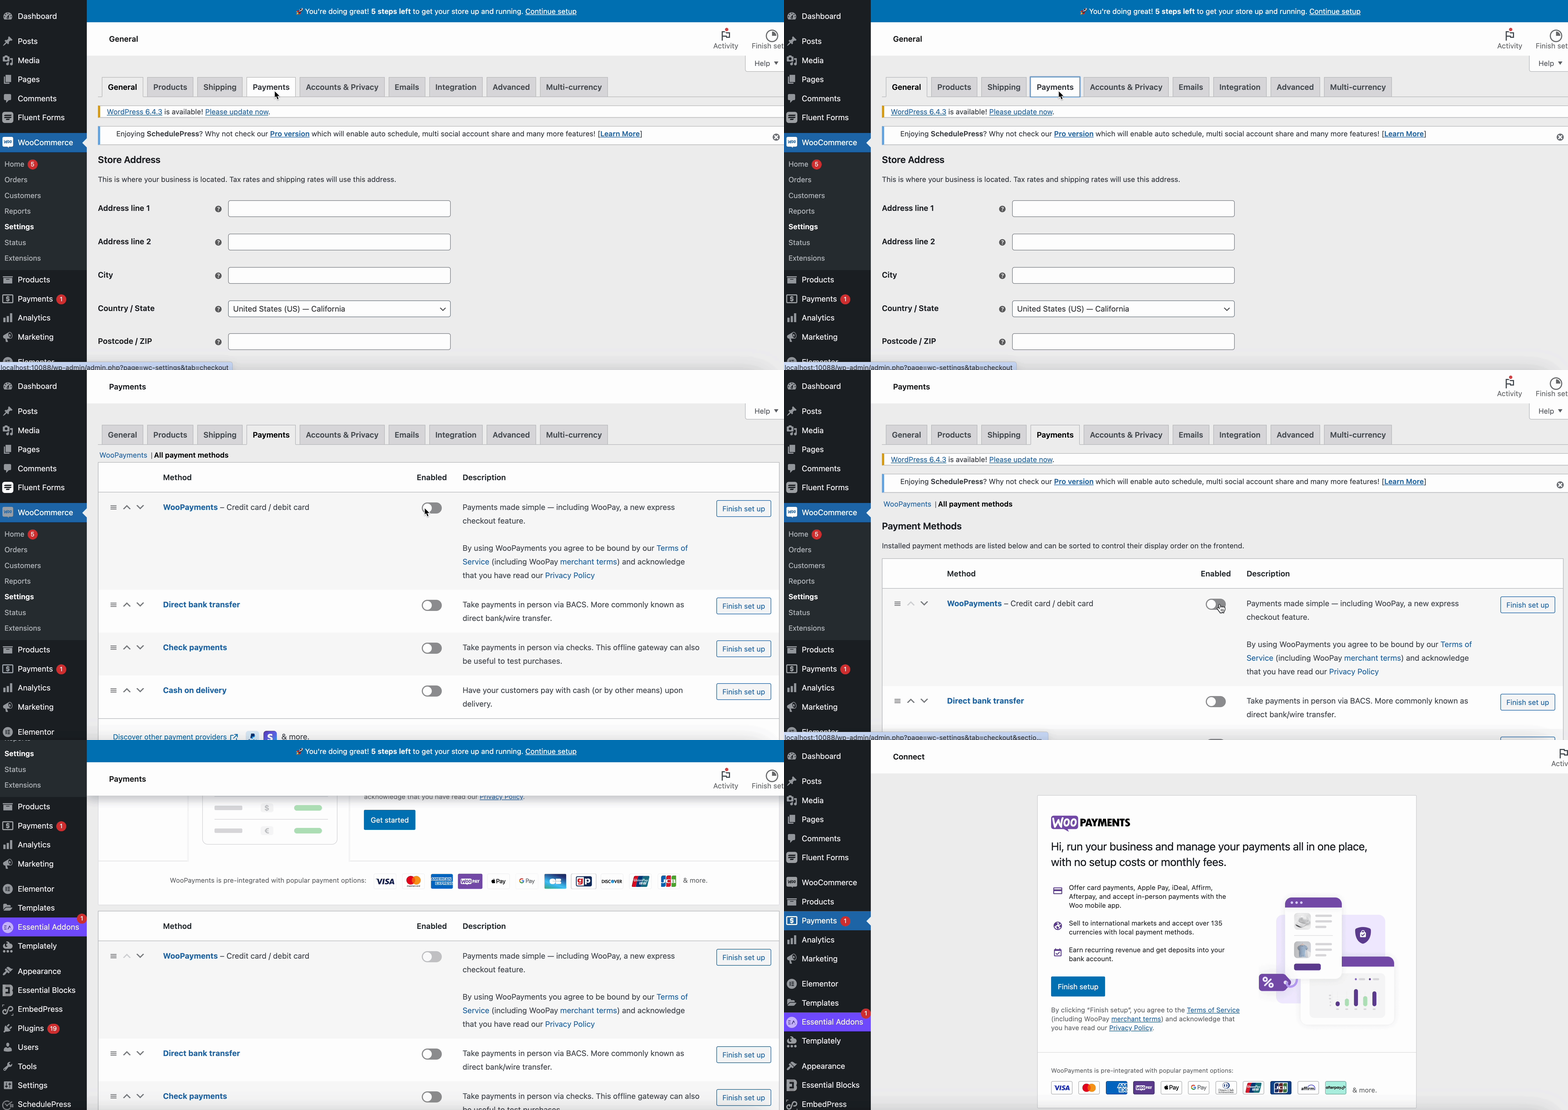
Moreover, this plugin is available in the WordPress repository, just install, activate, and go. Once the extension is active, click WooCommerce → Payments in your store’s WordPress dashboard. After that, click the ‘Get Started’ button. Proceed with the onboarding procedure to establish your account and confirm your company’s information with our payment partner. That is all; now you can use WooPayments to get paid. Happy selling!
Integrate Payment Gateway For Smooth Payment Transactions
It becomes simple and hassle-free to integrate a payment gateway when you choose the appropriate approach. Hopefully, by following this tutorial, you can easily manage your website payments and ensure smooth transactions. Want to learn more about WordPress payments? Then subscribe to our blog now.


