SchedulePress allows you to automatically share your scheduled WordPress posts on your LinkedIn account. By connecting LinkedIn with SchedulePress, you can automatically share your blog posts at the scheduled time. Besides, with its ‘Instant Share’ flexibility, you can share your post anytime you want on LinkedIn as well.
Moreover, you can now simultaneously share posts on ‘multiple LinkedIn accounts’ by using SchedulePress Pro. This feature would come in very handy if you want to grow your social media presence and give your brand some much-needed exposure. Follow the below guidelines to share your WordPress posts on your LinkedIn account:
Step 1 – Retrieve LinkedIn API Keys #
Make sure to retrieve your API Keys from your LinkedIn Developer Account first. Beforehand, you need to make sure that you already have created an App on LinkedIn. You will have to provide the necessary information: App Name, App Logo, Privacy Policy URL, and others. Make sure to connect your Company page with the App as well. If you don’t have a Company page, you can create one by following this link.

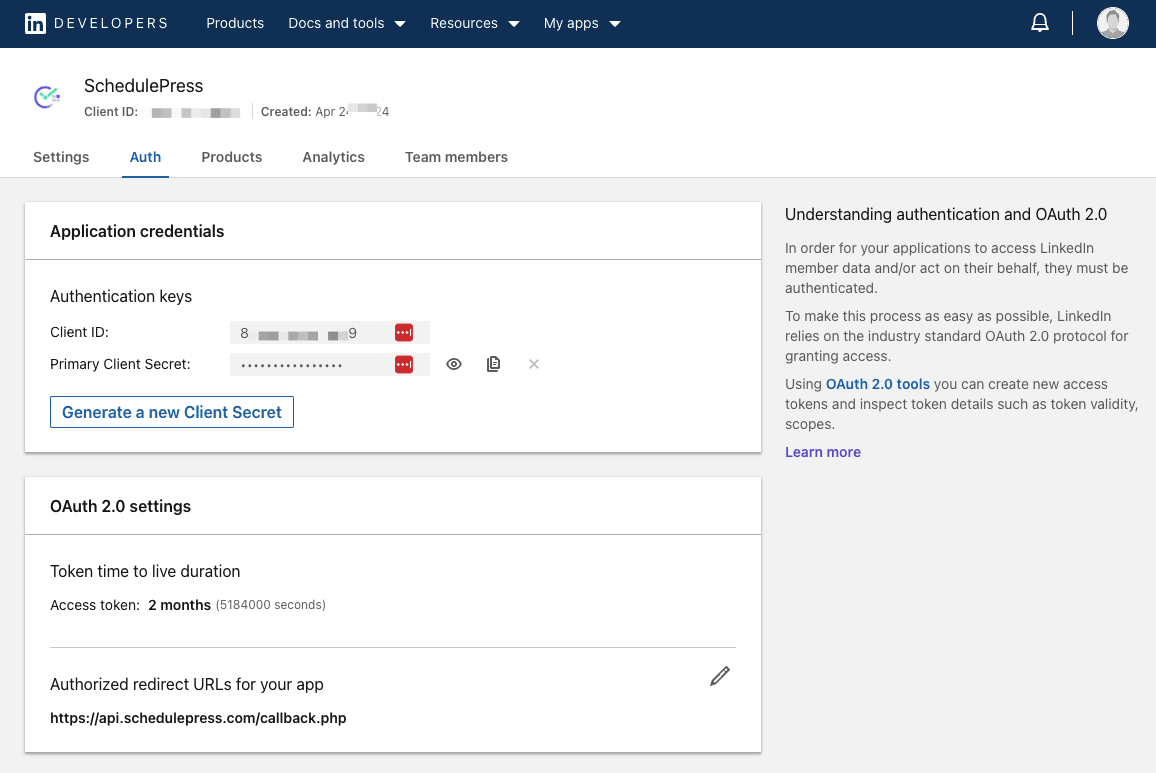
Let’s go to your App page and open the ‘Auth’ page. From here, you will find the ‘Client ID’ and ‘Client Secret’ API Keys. You can copy them from here.
Make sure to copy the following URL: “https://api.schedulepress.com/callback.php“ and paste it inside the ‘Redirect URLs’ option under ‘OAuth 2.0 Settings’.

Make sure you have enabled the ‘Share On LinkedIn‘ and ‘Sign in with LinkedIn‘ options by navigating to the ‘Products‘ tab from the LinkedIn app.

However, if you are a new user, you will find the option ‘Sign In With LinkedIn using OpenID Connect’.

Step 2 – Connect LinkedIn With SchedulePress #
After retrieving API Keys from your LinkedIn account, go to your WordPress Dashboard and navigate to wp-admin -> SchedulePress -> Settings. Then, simply open up the ‘Social Profile’ tab. Toggle on the ‘LinkedIn’ option to make it enabled. Afterward, select Profile or Page from drop down and simply click on ‘Add New’ to connect your LinkedIn profile or Page with SchedulePress.

After hitting on the ‘Add New’ button, you will get a popup. Here, toggle on the ‘Connect with App credentials’ and you’ll get two more fields to provide ‘App ID’ and ‘App Secret’. Now, provide your collected ‘Client ID’ and Client Secret’ of your LinkedIn account and click on the ‘Connect Your Account’ button.

If you are a new user, you need to toggle the ‘OpenID Connect’ button and then provide ‘App ID’ and ‘App Secret’. Now, provide your collected ‘Client ID’ and Client Secret’ of your LinkedIn account and click on the ‘Connect Your Account’ button.

After allowing permission to the App, the Access token will be successfully generated and SchedulePress will be connected with your LinkedIn profile.
By simply following the previous steps, you can add a new profile or page and connect multiple LinkedIn accounts with SchedulePress Pro as well.

Step 3 – Configure Social Templates #
Switch to the ‘Social Templates’ tab to make changes to your social share Template. You can configure the LinkedIn Template Settings and place around content parameters the way you want the shared post to appear. You can show your tags and categories as ‘Hashtags’ from here. You can even enable the ‘Content Source’ type as Excerpt or Content to showcase it as your LinkedIn template content. Also can set your LinkedIn ‘Status Limit’ as per your preference.

Additionally, you can set a limit to how often you can share a post on LinkedIn. By default, the limit is set to zero, which means you can share a post as many times as you want. But, you can change the value to any number and restrict it for sharing that number of times.
Step 4 – Schedule Your WordPress Post & Automatically Share It On LinkedIn Right Away #
If you schedule your WordPress post, it will automatically be shared on the LinkedIn account. Besides, if you want, you can even instantly share your live post on LinkedIn as well. To do that, go to your post and navigate to ‘Social Share Settings’ and choose ‘Profile’ or ‘Page’ from ‘LinkedIn’ social share platform. Then, simply hit the ‘Share Now’ button and your post will instantly be shared on your LinkedIn account. If you want, you can even upload a custom ‘Social Share Banner’ for your LinkedIn share as well.

Step 5 – Final Outcome #
After all of these previous steps are finished, it will automatically share WordPress posts on the LinkedIn profile when they go live. This is how it will appear on your LinkedIn account:

This is how with the help of SchedulePress, you can instantly share your WordPress posts on your multiple LinkedIn Accounts with absolute ease.
Getting Stuck? Feel free to contact our Dedicated Support Team for any further assistance.


